
You can create a template from a single document, a Folder, a File Cabinet, Notebook, Section, Notebook Page, or Notebook Entry for your own use or to share within a domain.
Sections in this Topic
Creating a Template
If your research involves repetitive steps, you can create and later redeploy templates to save time and ensure consistency and reproducibility. Almost anything in CERF can be turned into a template. CERF includes a number of pre-loaded empty files that you can use as templates, and you can also create your own templates made up of folders containing selected files or Notebook pages representing common workflows, with placeholders used to show where new data will be added when it becomes available.
Standard empty file templates that come with CERF include:
- Word Document
- Excel Spreadsheet
- PDF Document
- Powerpoint Presentation
- CERF HTML Document
- PNG Image
- Photoshop Image
- Genbank Image
- Molecule (.Mol)
- Cerf Table
Templates are available in two different places in CERF: 1) From the template chooser popup that typically appears whenever you choose a new resource or opt to make a new resource from a template. 2) When creating new Notebook Entry from the New Entry drop down and selecting a new blank file or a modified, custom notebook entry file that will be unique for that specific workstation.
One of the most common resources to use as the basis for a template in CERF is the CERF Notebook Page. This is because a notebook page often corresponds to a unit of work at many organizations (for example a single experiment, workflow, work day or process). To create a template from a specific Notebook Page, right-click on that Notebook Page in the Document Tree and select Tools > Create Template from the right-click menu
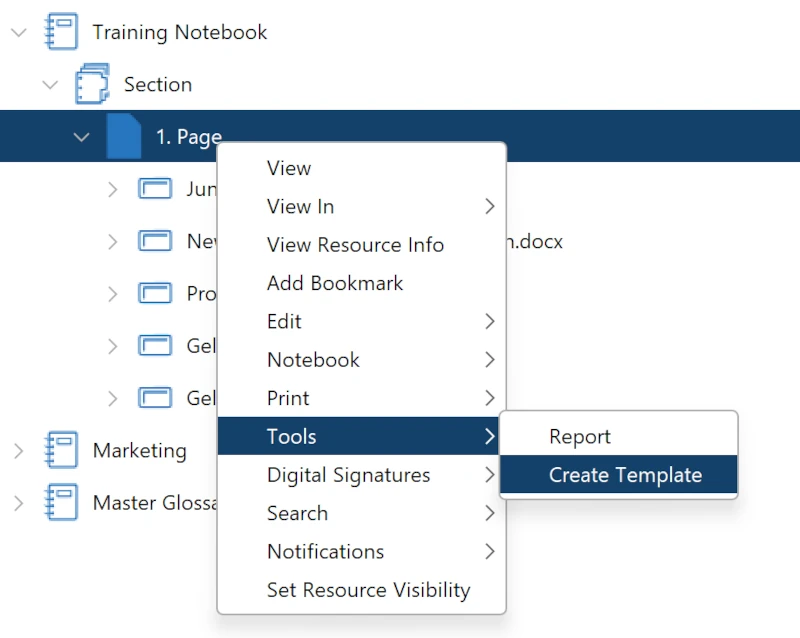
Similarly, right-click on a Notebook to create a Notebook template, on a section to create a Section Template, and on a Notebook Entry to create a Notebook Entry Template. The Create Template dialog launches, displaying the top-level Resource and any Resources it includes.
In the Create Template dialog rename the default template title (optional) to clearly identify it. We recommend that you add a version number to the title. Select a domain (optional). If the system administrator has created domains, this allows you to make this template available only to members of a selected domain. “Default” creates a domain in which you are the only member (and anyone you have added to your personal workgroup).
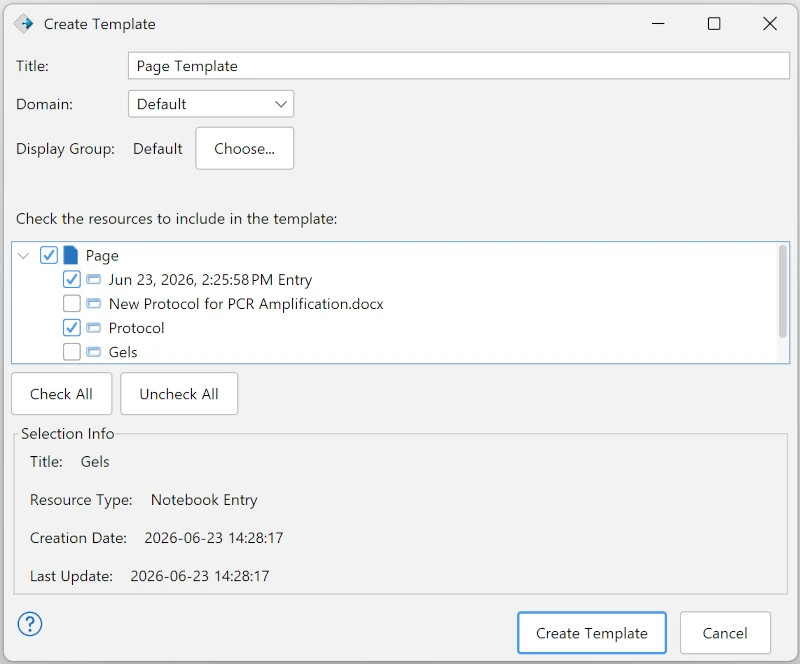
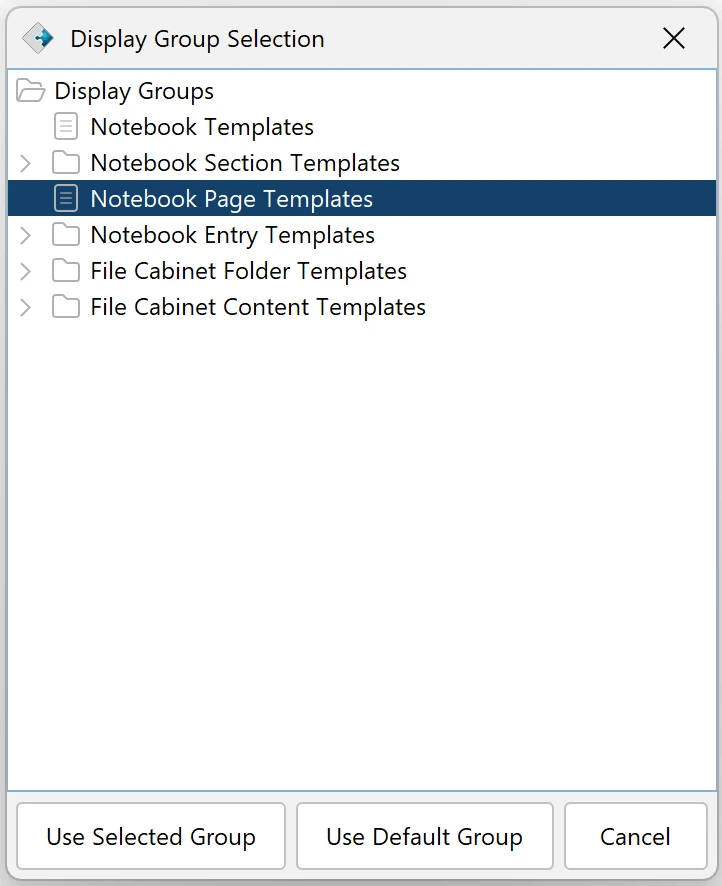
Click on Choose (in the above dialog) to select a Display Group for the template. This launches the Display Group Selection dialog.
Select a Display Group that matches the type of template you are creating. This will be important for finding the template later.
Click on Use Selected Group (at the bottom of the dialog).
In the Create Template dialog select checkboxes for the Resources you wish to keep in the template (the checkboxes can be individually selected/deselected or use the Check All/Uncheck All buttons). This is shown in the first image.
When you are finished, click on Create Template.
Note that Document Templates can be utilized in File Cabinets. The equivalent template for a Notebook is a Notebook Entry template, which contains a single resource.
If a template is made in error or is no longer in use, the System Administrator can remove it from the CERF server.
Note that any resources that have already been added to a Placeholder on the page will not be included when creating a new template from the page. Only the Placeholder can be included without existing content.
Using a Template
Some templates are included in CERF. You can also use templates that you have made or that you can access because you are a member of the Domain that owns the templates.
Notebook Resources
- Notebook – You must be a Notebook Creator in at least one of your workgroups to create a Notebook (and the business policy must allow users to create Notebooks). If these conditions are true, click on the New Collections
 button and select Notebook. You will find Notebook templates in the Create New Notebook dialog.
 - Notebook Section Template – Select a Notebook or on a Section (where you want to insert the new section) in the Navigation Tree, click on the New
 button, and select New Section. (Note that you can also do this by right-clicking on the Section and selecting Notebook > New Section). This launches the New Section dialog. The Section Templates group will contain section templates.
 - Notebook Page Template – Select a Notebook or a Section (where you want to insert the new page), click on the New button, and select New Page. (Alternatively, right-click on the Notebook or Section and select Notebook > New Page). Select a Page Template from the Notebook Page Templates group in the New Page dialog.
- Notebook Entry Template – Right-click on a Notebook Page and select Notebook > New Entry from template or when viewing the page in the Notebook Viewer, click on the New Entry button and select from Template. In the next dialog, select the template. This is where you will find document templates for Notebook Entries.
File Cabinet Resources
- File Cabinet – Create a File Cabinet and select the template in the New File Cabinet dialog.
- Folder – right-click on a File Cabinet or Folder and select Edit > New Folder from Template. Select a template in the next dialog.
- Document – right-click on a File Cabinet or Section and select Edit > New Document from Template. Select a template in the next dialog.
If you select a blank document with a specific extension, it’s likely that your next action may be to checkout-and-edit that file to create some content within it. Note that you will need an appropriate helper application installed on your local computer to do that.
Template Management on the web client
Note that you can manage templates only for templates that belong to domains in which you are Domain Administrator.
Once you’ve created a template, you can change its Template Group (i.e., this is the type of Resource the template invokes, such as a Document template, Notebook Entry template, Notebook Page Template, etc.), or its Domain (you can change it to another Domain in which you are Domain Administrator). These types of changes are performed on the CERF web client. When you first create a template, a Domain is created automatically for you in which you are Domain Administrator.
- Select Sessions > Manage Account from the main menu bar in CERF
- In the web client, select Resources > Templates from the menu displayed in the left panel. This opens the Template management page.
- On the left side of the page, find the template of interest (it should be found in the group where it was created) and click on it.
- Click on the Browse button at the bottom of the page to see the contents of this template
- Click on Edit if you want to change the Domain
Note: to change the Template Group, select the template and drag it to a different Template Group.
< Notebook Collections up Compliance >