
Sections in this Topic
Overview
Although your organization may not require digital signatures, CERF provides this feature. An electronic signature, which is the legal equivalent of a hand-written signature, captures the printed name of the signer, comments, and date/time of signing. After a Resource has been electronically signed, the electronic signature becomes a part of the document (i.e., the electronic signature cannot be removed) and the record cannot be changed (a new version is created).
Digital Signature Image
An image of a user’s physical signature can be uploaded to CERF to be placed in the printed PDF of signed resources or collections. The signature image will also be displayed in the Signatures section of the Resource Info Panel for signed resources. Users have one electronic signature, which is unique, authenticated, and protected from tampering.
Only an Admin can add a signature image to a user’s profile via the Web Client. This is also an excellent opportunity for an Admin to verify the physical signature of the user before adding the image to their account.
Uploading a Digital Signature Image
1) navigate to Access > Users, and select the user in the list and click the “Edit” button at the bottom of the screen. Note: a digital signature image can also be added when creating a new user account.
2) Select “Choose File” for the “Digital Signature Image” option, and choose a the scanned image of the user’s signature to be added.
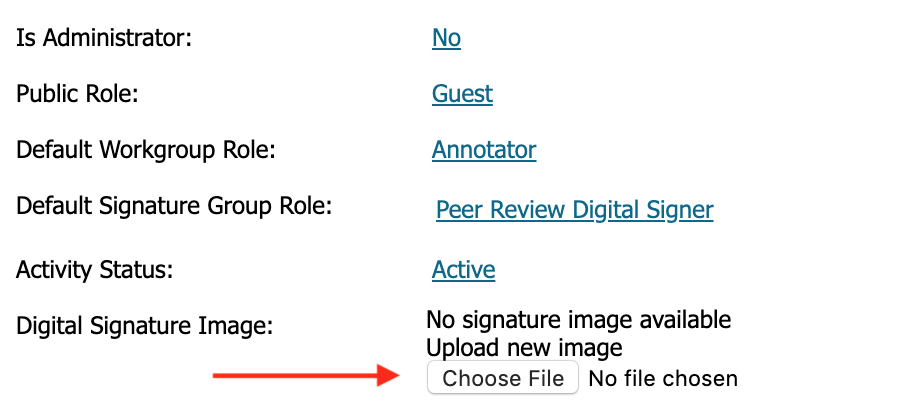
TIP: Use a .png, .jpg, or .jpeg image for best results. Some .tif files are known to cause issues.
Printed Signatures
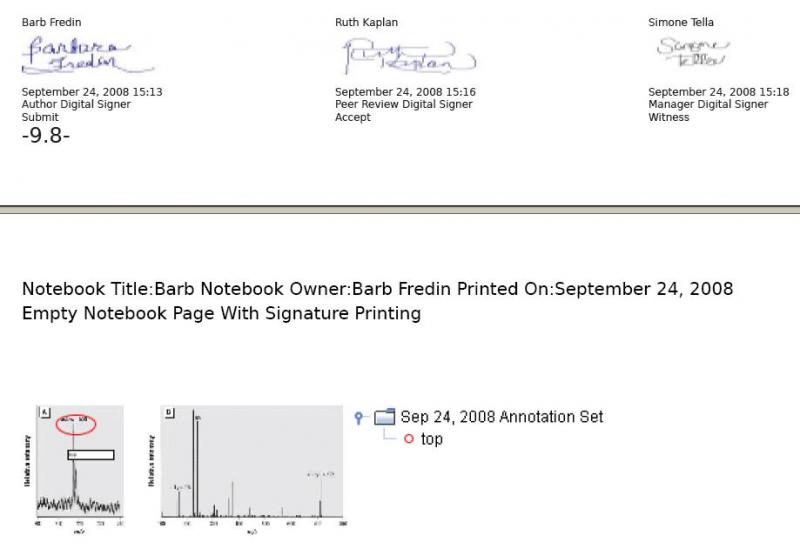
The default business policy setting displays signatures in the printed copy, if the resource has been signed. If your CERF administrator has uploaded a signature image, you will see that in addition to your printed signature.
The printed copy displays the signatures (Signer Name, time and date, and signature image if available) at the bottom of each printed entry on the page.
Requirements
Conditions for Signing
- The person who initiates signing must be the contributor for that resource and must have a workgroup role that allows signing.
- You will not be able to sign a Notebook Page if it has multiple contributors unless the other contributors sign or finalize their own entries.*
- If you initiate signing on a Private resource, it will be changed to Shared.
- You cannot sign a resource that is currently checked out for editing.
- You will not be able to sign a Resource if it includes other Resources with pending signatures (e.g., a Notebook Page may have pending signatures for one of its Entries). It may not be immediately apparent that there are pending signatures for linked Resources. Any Resource that has a link in another context (i.e., in a different Notebook or File Cabinet) can be signed in the other context, and if the link has pending signatures, the Sign action will not be enabled on the right-click menu.
- You cannot sign a resource that contains an unfulfilled placeholder.
- You cannot sign a Finalized Page, only the entries can be Finalized. To unfinalize a Page, an administrator can log into the Web Client, locate the Page in the Notebook Resources screen, then select the “Open/Unfinalize” tab, then click the “Open/Unfinalize” button
* A less obvious way to become a contributor is by editing the metadata or content of an Entry. If a new version is created at checkin, you become the contributor for the updated Entry. The original contributor is shown for the entry and the new contributor is shown for the entry content.
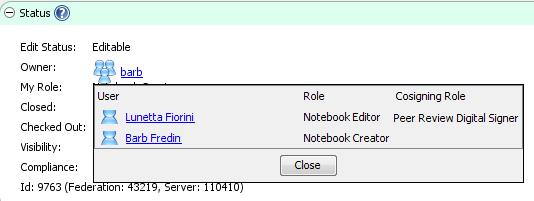
To see the list of your available cosigners prior to signing, select the Resource you want to sign in the Document Tree and look in the Info panel to the right. Click on the Owner (workgroup name) in the Status pane. If you have the correct combination of cosigner roles to meet the signature workflow requirements and if you are contributor, you will be able to sign.
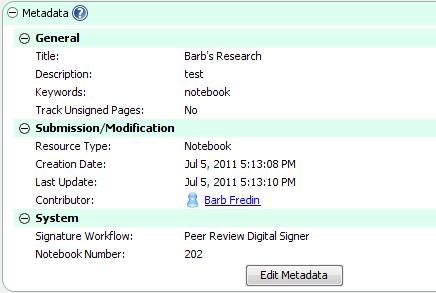
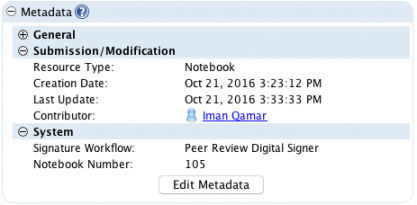
Select the Notebook in the Document Tree and look in the Info Panel to the right (Metadata pane) to see its Signature Workflow. You need to have cosigners with the cosigning roles in your workgroup that match this Signature Workflow:
Signature Workflow
When you create a new Notebook or File Cabinet, you must select a Signature Workflow. This workflow cannot be changed later, and it determines whether or not you will be required to have cosigners to sign a resource in this collection. The Signature Workflow specifies how many cosigners (if any) are required and what signing roles they must have.
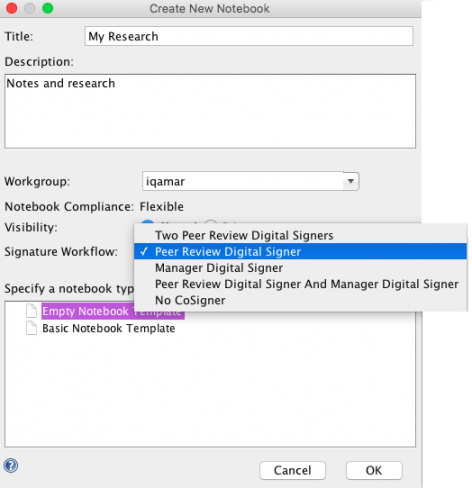
Cosigners are in your Signing Group, and different signing groups are associated with each workgroup. The System Administrator initially creates a signature group for you in each workgroup you are in. If you are a Workgroup Administrator, you will be able to edit the Signing Groups for this Workgroup using the web client (Sessions > Manage Account). To find out what the Signature Workflow is for a Notebook or File Cabinet, select it in the Document Tree and look at the metadata pane in the Info Panel (see image below).
Signature Workflow with No Cosigners
If the Signature Workflow in the Notebook or File Cabinet in which you are signing does NOT require any Cosigners, you will see a message when you try to sign (if no cosigners are available) that informs you that no cosigners are available. Click OK on this message dialog. The Sign Resource dialog will be launched, allowing you to sign as the only signer.
If you DO have Cosigners (but are not required to use them), you may add them, but this is optional. The Choose Cosigners dialog will be launched, allowing you to select Cosigners and initiate signing.
Signature Workflow with Cosigners
If the Signature Workflow DOES require Cosigners but you do not have the correct number or configuration of Cosigners in your Signing Group, you will see a message that you do not have enough cosigners. If you are a Workgroup Administrator, you can edit the Signing Group to add the correct number of cosigners, or contact the System Admin.
What is the Signature Workflow for an Existing File Cabinet or Notebook?
To find out what the Signature Workflow is, select the File Cabinet or Notebook in the Document Tree and look at the Metadata pane in the Info Panel:
Print before Signing
There is a CERF business policy that controls whether Notebooks, Sections, and Pages must be printed before they can be signed. Your System Administrator sets the policies for your organization. If this policy is set to True, CERF will display a message when you try to sign a Notebook, Section, or Page informing you that you must print the Notebook, Section, or Page and asks you if you want to do so now.
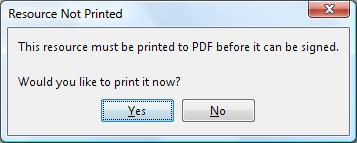
If the Notebook, Section, or Page has already been printed, CERF will tell you to View the Printed Copy (if required) or Sign the resource.
If no printed copy exists, CERF will send you a notification after you have printed the Notebook, Section, or Page saying that it is ready to sign.
After signing is completed, the printed copy will also be signed.
View before Signing
It is assumed that you will read the documents you are asked to sign or cosign. There is a business policy is CERF that can be configured (by the System Administrator) so that you are required to view a printed copy (if one exists) or view the resource itself in CERF before you can sign it. If you are required to print to PDF before signing, the signing button will be disabled (as shown below) and you view the PDF. If you are not required to print to PDF before signing, but if the policy requiring viewing is true, the signing button will be disabled until you select “View in CERF.”
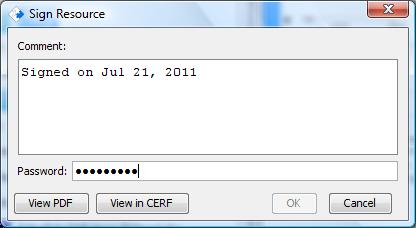
There is another business policy that determines the amount of time you must spend viewing the PDF copy prior to signing. If this policy is turned on, you will see the seconds counting down (circled below). When the “signing lag time” is reached, the Sign button will be enabled and you may sign the resource. Again, if you were required to print before signing, you must view the PDF for the length of time shown. If printing was not required but the Sign button is disabled, then you must view in CERF for the specified length of time.
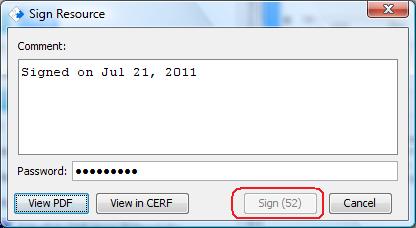
There are separate business policies for Signing and Cosigning.
< Updating up Signing >